Monday, January 31, 2011

Friday, January 28, 2011
 One of the fun activities on An Affair With Art is exhanging artworks in a 'mingle'. The subject is posted and members are given a specified amount of time to sign up. At the end of that period, the moderator gives each person the names of two members who are to receive her work. This is the piece I did for the 2011 Valentine 4x4 Mingle.
 The back ground is a pearl satin cardstock that I ran through the Vagabond with one of Tim Holtz Texture Fades. That was mounted on burgundy red cardstock. The red metallic heart is one I found at Hobby Lobby. The piece was finished with two Prima Flowers layered together and given a center of a red metallic fake brad. The work "Love" was cut out on the Expressions Cricut, using the "Alphalicious" Cartridge.
Wednesday, January 26, 2011

I've been busy doing art but forgot to post. Bad bad me. But here are some of the things I worked on.
One of my favorite activities is participation in an online art group who are having "An Affair with Art" In December we exchanged art pieces as a 12 day exchange if small handmade gifts. This is the one I made. It's a tag on the theme of the Christmas Season... Winter with snow and sparkle and evergreens.

I've also joined a 4x4 swap in that
group. The theme is Month by Month. I selected June because it's my birth month and I love pearls and roses and the fact that it's the bridge between Spring and Summer. This is the design I submitted.
Finally, this is a 4x4 I created as a gift for the Swap Coordinator. That not an easy job. I hope she feels appreciated. The images are from a new Graphic 45 offering called Once Upon a Springtime

Friday, September 3, 2010
New Artwork
I've been invited to join a wonderful online group called An Affair with Art. The terrific ladies who are members of the group are mixed media artists from all over the country. There are online swaps and 'mingles' and a monthly lottery where each participant makes one piece based on a theme, then at the end of the month there is a drawing and the winner gets the goodies. All of them. Then she selects a theme for the following month and the whole thing starts again.
I made some 'fern paper' this month and used that for my lottery entry. Below are some of the papers and the tag project I did for the lottery entry. I love tags. Love to make them, love to get them, love to give them... welllllll sometimes I would like to keep them, but that's half the fun of giving them up... they go to a new home where they will be loved and admired and that is defintely a good thing.


I made some 'fern paper' this month and used that for my lottery entry. Below are some of the papers and the tag project I did for the lottery entry. I love tags. Love to make them, love to get them, love to give them... welllllll sometimes I would like to keep them, but that's half the fun of giving them up... they go to a new home where they will be loved and admired and that is defintely a good thing.
The theme is "Numbers". I chose the number three, but decided to do something other than just use numerals.
So, I made fern paper with three ink colours
There are three elements in the design on the tag
There are three elements in the design on the tag
There are three colour feathers in each cockade and three feathers in each.
The numeral is 3, embellished with three colours of Perfect Pearls
There are three doubled strands of each colour fiber in the tassel at the top of the tag
Here is the tag for September's An Affair With Art Lottery, along with two samples of the fern paper I made


Monday, August 2, 2010
I promised to show you how to prepare a book for altering.

In the previous posting we talked about how to choose a book. Once you have inspected the book, know that the binding is a good one and the pages are in good condition to work on, the next step is to determine whether the fly leaf and end paper are in good shape. If not, you may want to add a new one. I'll get to that later. But on the chance that you will want to do that, don't do anything to that part of the book yet. The next step is to start removing pages to make room for the artwork that will be put in the book.
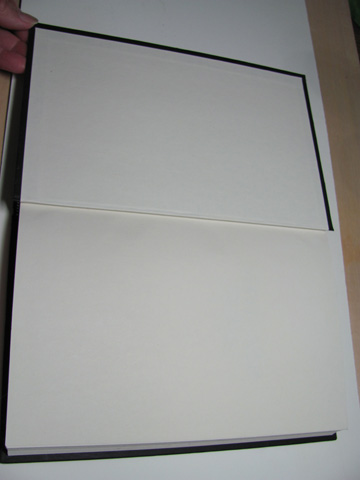
The flyleaf and end paper are in good condition here and there is no sign of tearing or stress in the fold
<----End paper
<----Fold
<---Flyleaf
This book is ready to prep. Consider skipping the first few pages before you start removing pages. This will give you options for a sign in page if you are going to enter the book in a round robin swap or for the pages to introduce your theme.
There are several good methods for removing pages from the book. The best and most common are:
- Tear against a ruler
- Free-hand tear
- Cut away
 It is probably not a good idea to tear out all the way to the stitching due to the risk of damaging the thread, especially if the book is an old one or a cheaper new binding. In this picture you can see that the ruler is held against the center, near the seam. This keeps the tear from going all the way to the stitching.
This also ensures a relatively straight tear and allows you to 'grade' or 'shade' the tears so they are not all exactly the same distance from the binding.
 Some artists prefer to cut the pages because it gives them greater control.
To do this, insert a thin cutting mat under the page to be removed. Lay a ruler on the page so that the left edge is where you want to cut. Use a good sharp craft knife to cut the pages. I suggest that you take the time to do one at a time.
 An easy way to remove pages is free-hand tearing. Use the thumb or a finger from the other hand to guide the tear so it doesn't get into the binding seam.Always tear slowly so that you can stop if you are getting too close to the center of the book.
*Note: if you are going to be folding pages to the center, the part of the page that is left after tearing or cutting will allow you to glue or tape to that piece. This is helpful if you are making a pocket with the folded page.

I like to save the pages I tear out. This gives me the chance to use the book pages for collage or to cut out words/phrases for another page. You can also save illustrations or photos to use later.
 This is how your book will look when some of the pages are removed. If you will be the only one working in it, you can remove pages as you go. If it will be entered in a round robin in which other artists will be working in it, you will probably want to remove pages through the entire book. Some of your participants may not know that they need to make room for their wonderful creations. Do it for them to save yourself (and them) some sad surprises.
Some guidelines for you when working in other artists' books:
- If pages have not been removed by the book owner, you should remove sufficient pages to make room for your work. If what you are doing is 5 or 6 pages thick, then remove that many plus one, from the area where you are working.
- Remember, even a coat of paint adds thickness to a page. If you are using only ink that is not an issue, but paint definitely IS.
- Do not start your work on the back of someone else's work. That also creates problems with thickness and you run the risk of accidentally getting paint or other media on the previous pages. It can also cause problems with the page that has already been completed.
- Use wax paper or freezer paper behind the pages where you are working. That way any excess paint or gesso or medium will be on the wax paper not the previous artist's work.
Tuesday, July 6, 2010
It's been a while. I didn't intend to take so long, but things have a way of happening. We have a very sick cat and then my camera died and I couldn't do the images to go with my planned texts.
Since I am planning to teach an altered book class (see below for the June 13 entry) I thought it would be good to post a short tutorial about selecting a book to work on.
I have my camera back and have some pictures now. Soooo... without further ado, here is that short tutorial.
If you open the book so that the center of a signature is exposed (that's the opening in the middle of the set of pages) you should be able to see evidence of the stitching. This book will hold up well as you work in it. The next step, which I will post next week is about prepping the book to work in it.
Next is an example of a book that won't work for altering.
Below is an example of a glued binding. The glue isn't always so obvious, but you can see that there is no evidence of the kind of scalloped shaped that characterize a sewn book. This particular example is a Reader's Digest Condensed book and is typical of these publications. Although the book itself isn't a good candidate for altering, you may want to try to use the attractive covers for another purpose

Since I am planning to teach an altered book class (see below for the June 13 entry) I thought it would be good to post a short tutorial about selecting a book to work on.
I have my camera back and have some pictures now. Soooo... without further ado, here is that short tutorial.
- Look for a book in reasonably good condition. A little worn and messy is OK, but the binding should not be severely broken. Experienced artists can fix a lot of things but you don't want to start your journey in altered books with a problem
- Inspect the book to see if it is sewn rather than glued. A glued binding will not hold up to the stresses of altering.
- Check along the header tape for the scalloped shape of each signature.

If you open the book so that the center of a signature is exposed (that's the opening in the middle of the set of pages) you should be able to see evidence of the stitching. This book will hold up well as you work in it. The next step, which I will post next week is about prepping the book to work in it.
Next is an example of a book that won't work for altering.
Below is an example of a glued binding. The glue isn't always so obvious, but you can see that there is no evidence of the kind of scalloped shaped that characterize a sewn book. This particular example is a Reader's Digest Condensed book and is typical of these publications. Although the book itself isn't a good candidate for altering, you may want to try to use the attractive covers for another purpose
Sunday, June 13, 2010
As promised, I am posting information about my first class as a free lance teacher on this blog. I am happy to announce ......
Beginning an Altered Book Journey
1 to 3 PM. July 10, 2010
At Stamps and More by Eleanor
2510 River Rd
Piedmont SC 29673
(exit 39 off I-85)
Ph. 864 295 2929
Toll free 877 296 2929
Cost $30
Call the store to reserve your seat
You will need to pack
A book to alter (more about how to choose a book in another post)
Basic tool Kit of
scissors
ruler (Tim Holtz ruler recommended)
personal paper trimmer
craft knife with fresh blades
cutting mat
double sided tape
paper awl
bone folder
large eye needle
All other tools will be provided along with a class kit of materials to use in the book.
In this class you will learn how to evaluate books for altering, how to prepare the book, a variety of techniques for creating layouts and interesting features for your pages and some methods for creating covers that give a clue to the theme of the book.
You will receive your class kit containing materials for your pages, a handout with instructions for the techniques you will practice in class, information about how to evaluate books for altering, and a list of publications you will find useful as you continue your creative journey in altered books.
Subscribe to:
Posts (Atom)